
An internet address of a website that is readable to humans and can be used to reach the website is called a domain name. This translation of human-readable names into machine-readable ones is carried out by the Domain Name System or DNS for short. The DNS settings for your website should be correct or else the operation of your services might get disrupted. For example, your domain might become unavailable or mail won’t reach your mail server.
Plesk can act as a primary (master) or a secondary (slave) name server for your domains. The configuration of DNS settings is done automatically, but it can be changed from the interface. If the third-party name servers provide DNS service for your domains, it is possible to disable the DNS service in Plesk.
Steps to Add and Modify DNS Records
Note: This section is basically made for advanced users. If the DNS settings configuration is done incorrectly, it can have a negative effect on your website and mail accessibility.
1. Plesk automatically creates a DNS zone for each new domain name in accordance with the settings configured by your service provider. With automatic configuration, the domain names should work fine. But, if you use Plesk NS server want to customize modifications in the domain name zone, you can perform those via your control panel.
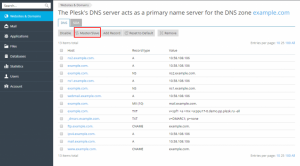
2. You can see the resource records in a DNS zone of a domain by going to Websites & Domains – DNS Settings.

3. Go to Websites & Domains > DNS Settings > Add Record for adding a resource record to the zone.

4. The properties of a resource record can be modified by going to Websites & Domains > DNS Settings and click on the record.
5. Along with the resource records mentioned above, there is also a Start of Authority record. It indicates that this DNS name server is responsible for the DNS zone of a domain. It also comprises of settings that affect transmission of information about the DNS zone in the Domain Name System.
Using External NS Servers
In case you host websites on your account without using Plesk as your primary (master) NS server, you can check the following options:
- You can use Plesk name server as a secondary (slave) name server. If you have a standalone name server acting as a primary (master) name server for your websites., this option is best for you.
- You can also disable DNS for your domain in Plesk. If you have external primary and secondary name servers that are authoritative for your websites, this option is the best to use.
1. You can switch the Plesk DNS server to a secondary name server by simply navigating to Websites & Domains > DNS Settings and clicking on Master/Slave.
2. The Plesk DNS server can be reverted to the primary name server by navigating to Websites & Domains > DNS Settings and click Master/Slave.
3. In order to switch off Plesk’s DNS service for a site served by external name servers, hover to to Websites & Domains > DNS Settings and click Disable.
These are the steps to manage your DNS record in Plesk.