
The following instructions will guide you through the SSL installation process on Microsoft Exchange 2013 EAC. If you still have not generated your certificate and completed the validation process, reference our CSR Generation Instructions.
What You’ll Need
1. Your server certificate
This is the certificate you received from the CA for your domain. You may have received this via email. If not, you can download it by visiting your Account Dashboard and clicking on your order.
2. Your intermediate certificates
These files allow the devices connecting to your server to identify the issuing CA. There may be more than one of these certificates. If you got your certificate in a ZIP folder, it should also contain the Intermediate certificate(s), which is sometimes referred to as a ‘CA Bundle.’
If not, download the appropriate CA Bundle for your certificate.
3. Your private key
This file should be on your server, or in your possession if you generated your CSR from a free generator tool.
SSL/TLS Certificate Installation Instructions for Microsoft Exchange 2013 EAC
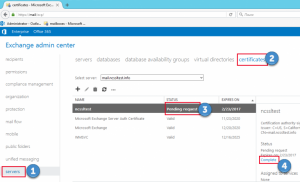
1. Complete your “Pending Request”.
In the Exchange Admin Center, click on “Services”, go to “Certificates” and select the Pending Request. Then, click on “Complete” in the menu located on the right-hand side.
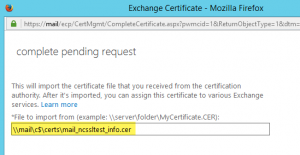
2. Provide the path of the saved certificate.
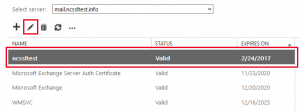
3. Review the “Status” column and see if the certificate is now Valid.
Once the pending request is completed and you are directed to certificates menu, you will be notified in the Status column that the certificate is now valid.
Note: SSL/TLS Certificates which are installed for Exchange services such as Outlook, ActiveSync, POP, SMTP, IMTP, etc. are not enabled automatically. It must be done manually by enabling the SSL/TLS certificate through the “edit” button.
Enable SSL/TLS Certificate for Exchange Services
1. Choose the services that you want to enable encryption for.
Select the services for which you want to enable the SSL/TLS Certificate, and edit configuration of the installed SSL/TLS Certificate. While doing this you might notice that certain services are active by default and therefore it cannot be changed. It’s because Microsoft Exchange 2013 does not offer the editing of the SSL/TLS Certificate from the services. Instead of that, you would have to assign another SSL/TLS Certificate for these services that will be overwritten on the existing one.

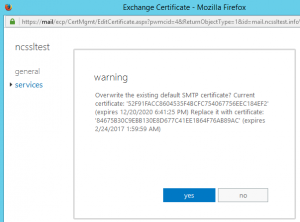
5. Overwrite any existing certificates.
If you are heading towards overwriting the existing SSL/TLS Certificate, you will receive a warning message as shown below. Nothing to worry about, it’s shown just because the self-signed server certificate was already installed. Just click “Yes” to confirm overwriting.
Congratulations, the SSL/TLS Certificate has been installed on your server!