The following instructions will guide you through the SSL installation process on Google App Engine. If you still have not generated your certificate and completed the validation process, reference our CSR Generation Instructions.
What You’ll Need
1. Your server certificate
This is the certificate you received from the CA for your domain. You may have received this via email. If not, you can download it by visiting your Account Dashboard and clicking on your order.
2. Your intermediate certificates
These files allow the devices connecting to your server to identify the issuing CA. There may be more than one of these certificates. If you got your certificate in a ZIP folder, it should also contain the Intermediate certificate(s), which is sometimes referred to as a ‘CA Bundle.’
If not, download the appropriate CA Bundle for your certificate.
3. Your private key
This file should be on your server, or in your possession if you generated your CSR from a free generator tool.
SSL/TLS Certificate Installation Instructions for Google App Engine
1. Log into your Google Cloud account at https://cloud.google.com
Go to Products & Services > App Engine

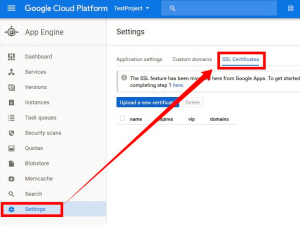
2. In the App Engine
Select SSL Certificates from the Settings option

3. In SSL Certificates
click on “Upload a new certificate” button & you will be shown the “Add a new SSL Certificate” option

4. Locate certificate files
Now, you must locate certificate files & the Private Key code that you had generated with the CSR. After that, click on “Upload” button to complete the installation process.
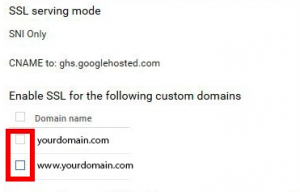
Finally, you will see a page consisting of SSL installation details in it. Choose the domains you want to secure under “Enable SSL for the following custom domains” option & click “Save” button.

