This interface is the advanced version of Simple Zone Editor, which we have gone through in the previous chapter. We can add, edit or delete various types of records here, which are A, AAAA, CNAME (Conical Name Record), SRV (Service Record), TXT (Text Record). We can also configure TTL (Time to Live) with records in this interface.
TTL (Time to Live) indicates the time duration that DNS servers can cache resource records prior to discarding the information.
-
Reset Zone Files
This option resets every change that you made in your cPanel account regarding DNS records. It also resets the changes made using Simple Zone Editor. To reset Zone Files, follow these steps:
Step (1) – Navigate to cPanel Advanced Zone Editor by clicking on Advanced Zone Editor link found in Domains Section of cPanel Interface.

Step (2) – Find Reset Zone File and click on more link.

Step (3) – It will show you a warning that all modifications in Zone files will be erased. Select the checkbox for the Are you sure you want to erase all entries and revert to the default state?

Step (4) – Press Reset Zone File button to reset the zone file to their default state. If successful, you will see a success message shown below.

-
Add an Arecord
The ‘A’ type of resource records are Host Name records. They contain the IPaddress of a specific host and map the Domain Name with 32-bit IP address. To add an A record, follow these steps.
Step (1) – Find Add a Record Section in the Advance Zone Editor.
Step (2) – Select Record ‘Type A’ from Type Dropdown Menu.
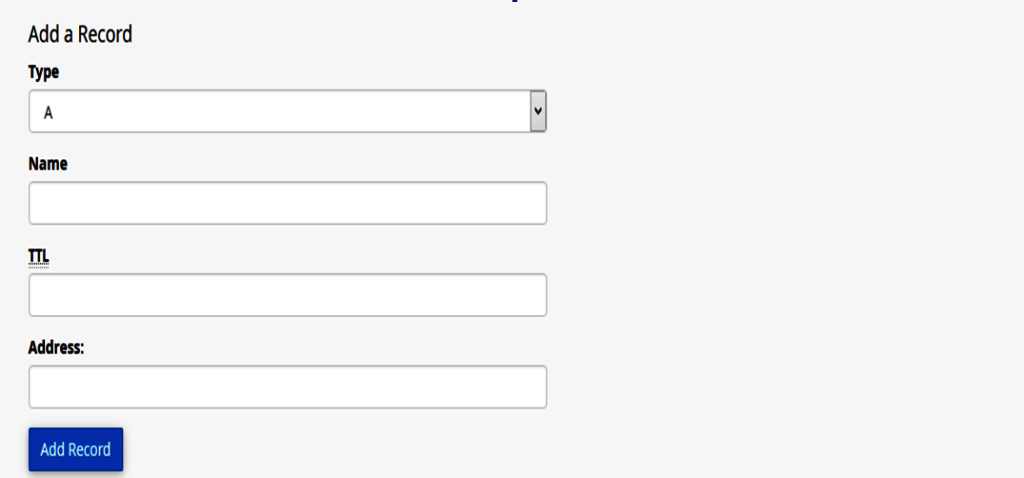
Step (3) – Enter Name of your A record. Enter TTL value, if there is no specific need, you can use default which is 14400. Also enter IP address of record in the Address textbox.
Step (4) – Click Add Record to save the record in the DNS entries.
-
Add an AAAA Record
The AAAA resource records bind hostnames with IPv6 Address, which is a 128-bitIP address.
Step (1) – Find Add a Record Section in the Advance Zone Editor.
Step (2) – Select Record type AAAA from the dropdown menu.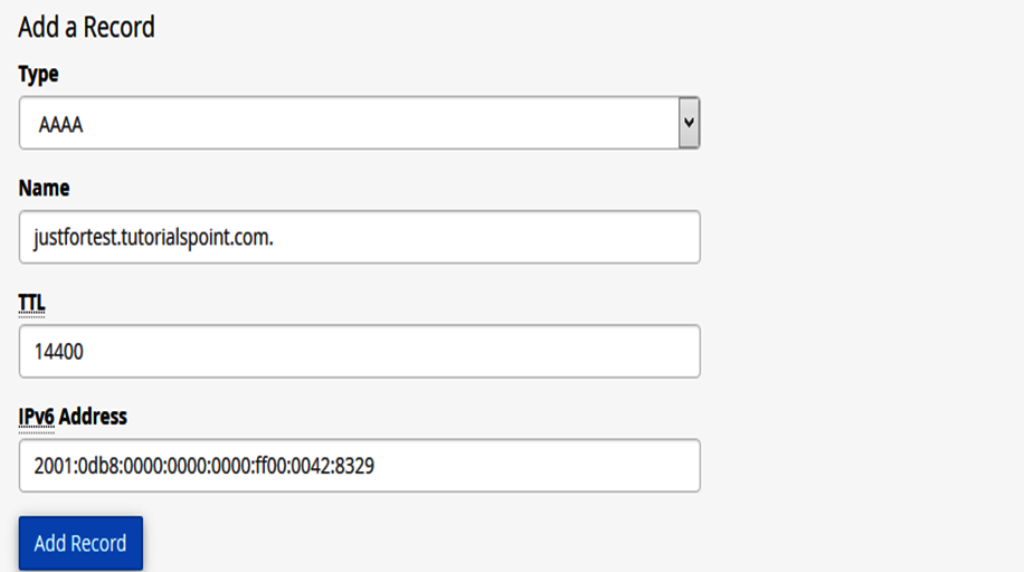
Step (3) – Enter the Hostname in the Name textbox and TTL value in the TTL
textbox, unless required use default TTL value, which is 14400.
Step (4) – Enter 128-bit IPv6 address in IPv6 Address textbox to which you want your hostname to bind.
Step (5) – Click Add Record to save this AAAA record in your DNS entries.
-
Add a CNAME Record
CNAME records are used to add an Alias to its associated domain name. You can point multiple CNAME records to a single A record so that when the DNS looks up for the Alias, you can simply rename a host, which is defined in A records.
To add a CNAME record, please follow these steps.
Step (1) – Find Add a Record Section in the Advance Zone Editor.
Step (2) – Select Record type CNAME from dropdown menu.
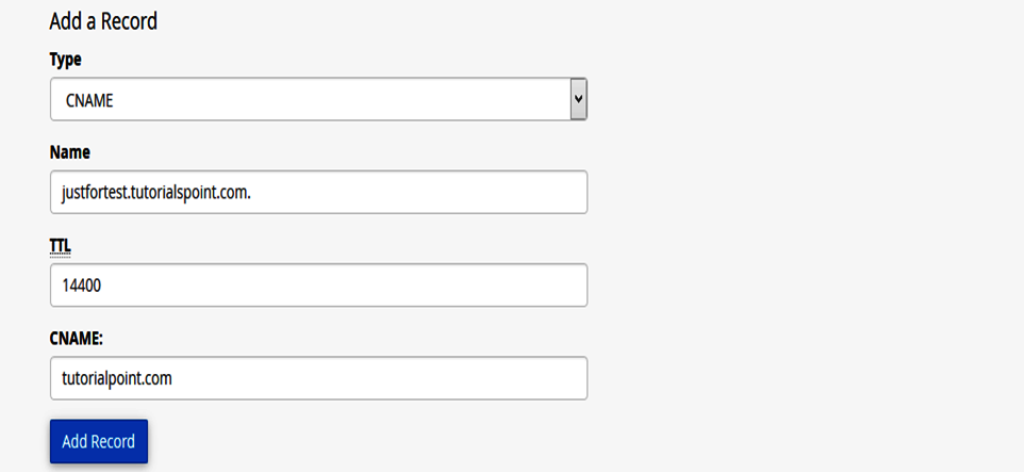
Step (3) – Enter your Subdomain or Alias to Name text input, also provide TTLvalue in TTL textbox, unless required use default TTL value, which is 14400.
Step (4) – Enter a valid zone name or domain name to which you want this Alias to point to, in the CNAME textbox.
Step (5) – Press Add Record Button to save this CNAME record to your DNSentries.
-
Add an SRV Record
This resource record provides information about available services in the specific ports of your server. They associate the location of a service with details on how the service can be contacted on a specific domain. An SRV record must point to a hostname with an A record.
To add an SRV record, please follow these steps.
Step (1) – Find Add a Record Section in the Advance Zone Editor.
Step (2) – Select Record type SRV from dropdown menu.
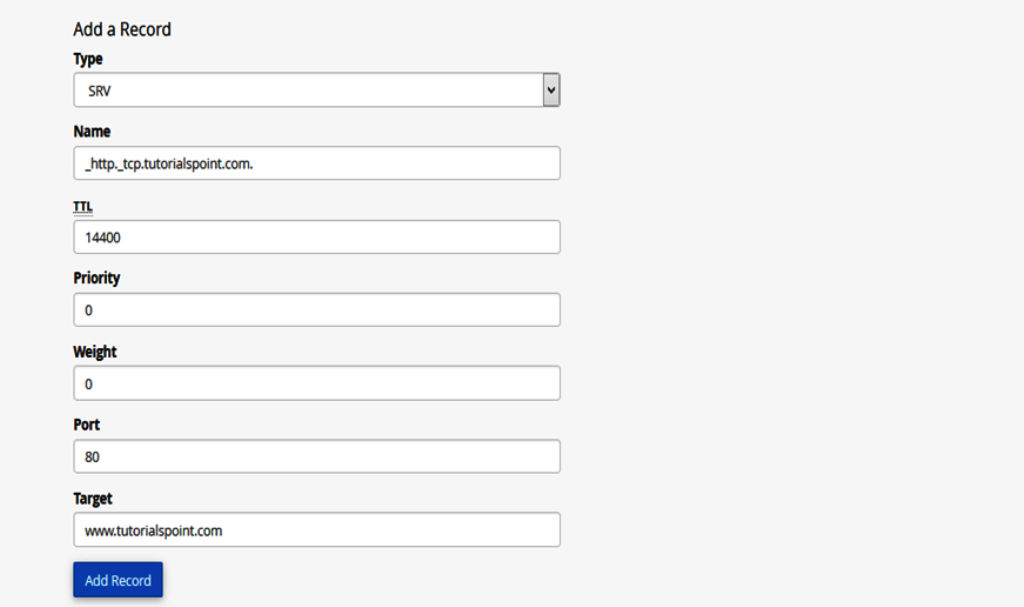
Step (3) – Enter Name of Service and Protocol both preceded by an underscore(_) and separated by dot (.).
Step (4) – Provide TTL value in TTL textbox, unless required use default TTLvalue, which is 14400.
Step (5) – Provide Priority of the Service, the lower the number in priority, higher is the priority of the service. 0 (zero) has the highest priority.
Step (6) – Enter Weight of the service, it is used by zone administrators to distribute the load to multiple targets. 0 is the lowest load.
Step (7) – Enter the Port on which service is actually offered.
Step (8) – Enter Target, it is the name of the host that will receive this service.
Step (9) – Press Add Record to add this SRV record into your DNS entries.
-
Add a TXT Record
The TXT records can hold any type of text. A domain name can have many TXT records, most common TXT records are used to define SPF (Sender Policy Framework) or DKIM, which is used for Email Authentication.
To add a TXT record, please follow these steps.
Step (1) – Find Add a Record Section in the Advance Zone Editor.
Step (2) – Select Record type TXT from the dropdown menu.

Step (3) – Enter Valid DNS Zone name in Name textbox.
Step (4) – Provide TTL value in TTL textbox, unless required use default TTLvalue, which is 14400.
Step (5) – Enter TXT Data, it can be any type of text, or a SPF or DKIM data.
Step (6) – Press Add Record Button to add this TXT record to DNS records.
-
Edit or Delete a DNS Record
To edit or Delete a DNS record, you added earlier. Follow these steps:
Step (1) – Scroll down to Zone File Records in Advanced Zone Editor.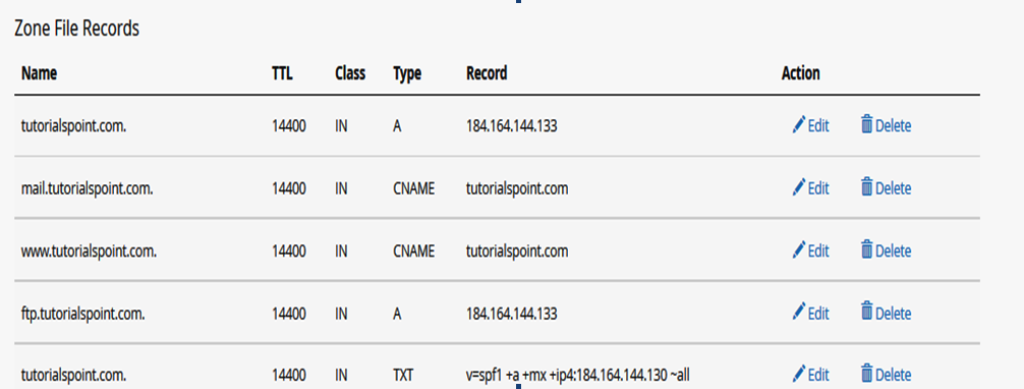
Step (2) – Find the DNS resource record you wish to edit or delete from the list of records.
Step (3) – To Edit an entry, click Edit Link from Action, which is corresponding to the record you wish to edit.
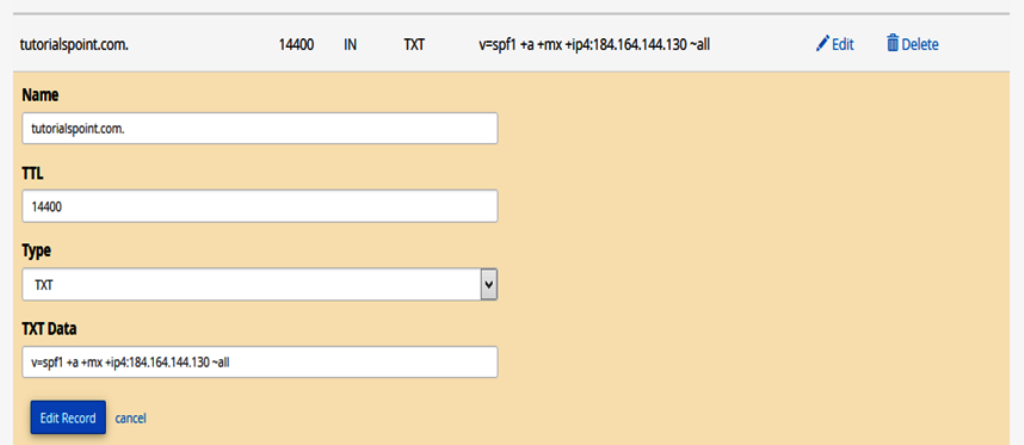
Step (4) – Edit your record according to your need and Click Edit Record button to save the changes.
Step (5) – To delete a record click on Delete link corresponding to the record you wish to delete.

Step (6) – You will be asked for confirmation, press Delete button to delete the record.
