
ConfigServer Security & Firewall (CSF) is a powerful free firewall solution designed specifically for Linux servers (Linux distributions and Linux-based VPS). It integrates seamlessly with cPanel/WHM to give a robust security layer for the protection of your server from a variety of threats. Let’s explore how to install and configure CSF for cPanel/WHM to enhance your server’s security.
What is A CSF Firewall?
The CSF Firewall is a comprehensive firewall configuration script developed to provide enhanced security for your server. It has a user-friendly interface so CSF simplifies the management of firewall settings to make sure that your server is well-protected. It configures your server’s firewall to restrict public access to certain services while allowing essential connections like FTP login, email checking, and website loading.
Key Features of CSF
CSF includes a Login Failure Daemon (LFD) that monitors user activity for multiple login failures – a common sign of brute force attacks. Thus, LFD temporarily blocks that IP from accessing any services on your server when an IP address triggers multiple failed login attempts.
These blocks are automatically lifted after some time. Later, you can manually remove or manage IPs through the CSF interface in WebHost Manager (WHM). Also, CSF allows you to whitelist or blacklist IPs. You can have real-time monitoring and automated IP blocking.
Why Use CSF for cPanel/WHM?
CSF offers various security features such as detection of login attempts, intrusion, and flood attacks. CSF Firewall integrates with cPanel, DirectAdmin, and Webmin. Though, this guide focuses on how to install CSF for cPanel/WHM via the command line. CSF is adept at recognizing various attack types including port scans, SYN floods, and brute force attacks on services. Also, it is configured to block attacking clients temporarily. Read on to learn how to install and configure CSF for cPanel/WHM.
- Log in to the WHM.
- Select the Server Configuration option.
- Click on Terminal to open the WHM terminal window.
- Copy/enter this code in the Terminal window.
cd /usr/local/src/
wget https://download.configserver.com/csf.tgz
tar -xzf csf.tgz
cd csf
sh install.sh
- WHM will run the command and automatically download the compatible version of CSF for cPanel.
- Press Enter to run the installation.
- Display a success message for the completed installation.
CSF Installation for WHM/cPanel
Once you install the CSF application, you will have to configure it.
- Go back to the Home of your WHM dashboard and select the Plugins option from the navigation menu.
- you will see the option ConfigServer Security & Firewall. Click on it.
- Click on the csf tab.
- Scroll down a little to the csf – ConfigServer Firewall section and click on the Firewall Configuration button.
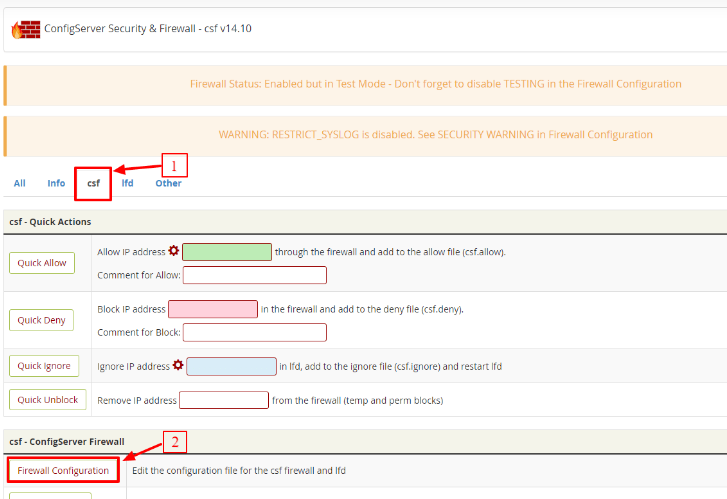
- You will find all the options for the firewall configurations. We will see a quick rundown on the important settings to get you started.
- Above you have learned How to Configure CSF. Now let’s explore Settings for Port Filtering Configuration
1. Settings for Port Filtering Configuration – IPv4 Port
- TCP_IN = “20,21,22,25,53,80,110,143,443,465,587,993,995,2077,2078,2082,2083,2086,2087,2095,2096,26”
- TCP_OUT = “20,21,22,25,37,43,53,80,110,113,443,587,873,2086,2087,2089,2703”
- UDP_IN 20,21,53
- UDP_OUT 20,21,53,113,123,873,6277
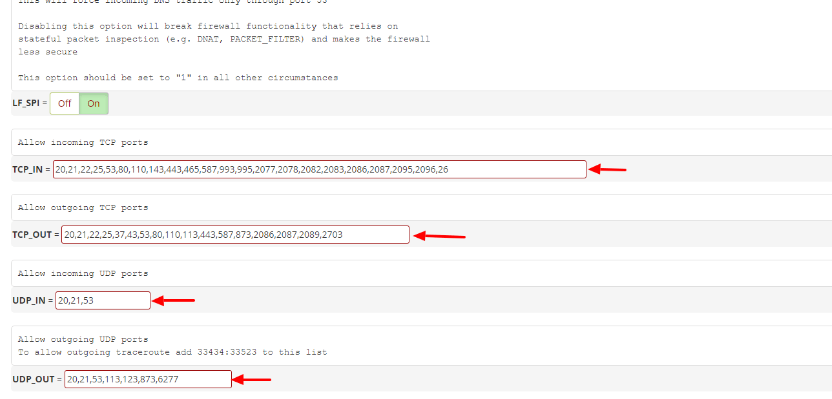
- Once you have changed your SSH port number, add this new port on the IPv4 Port Settings and/or IPv6 Port Settings. You can also add a specific port for a newly installed application on the server from this section.
- We recommend the users who deploy the R1soft/Idera external backup solution to allow the inbound traffic for TCP port 1167 in the port TCP_IN section.
2. Activate the Syslog Monitoring
- Scroll down to the General Settings section and set the SYSLOG_CHECK to 1800.

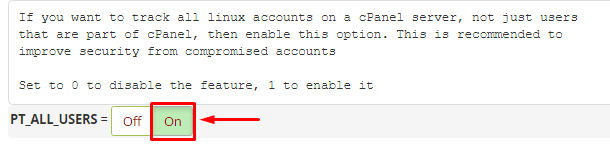
3. Activate the Detection of Suspicious Processes
- Scroll down to the Process Tracking section.
- Set “PT_ALL_USERS” to “ON“
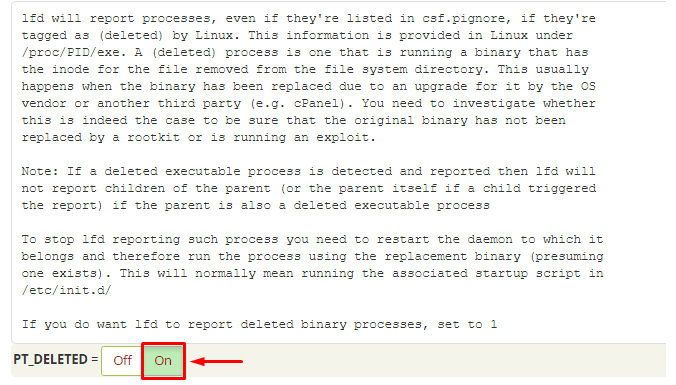
- Set “PT_DELETED” to “ON“
4. Activate Spam Protection and Detection of Suspicious Emails
- With CSF, you can secure your server from spams and bulk email activity.
- Scroll down to the SMTP Settings section.
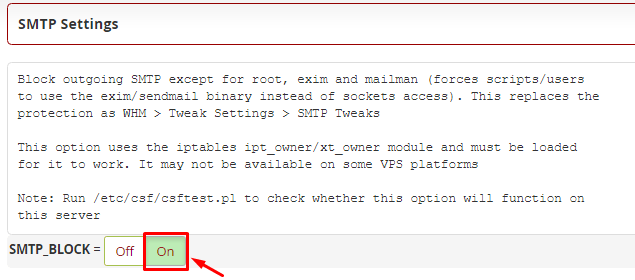
- Switch the SMTP_BLOCK to On.
- Scroll down to the Login Failure Blocking and Alerts section.
- Locate the LF_SCRIPT_LIMIT and set it to 250. It will detect the scripts sending more than 250 emails in an hour.
- Switch the LF_SCRIPT_ALERT to On. It will alert the system administrator via email when the LF_SCRIPT_LIMIT is breached.

5. Save the Changes and Confirm the Status
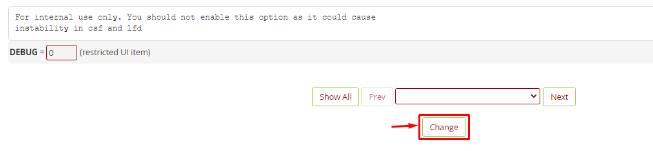
- Scroll down to the end of the page and click the Change button.
- save the configurations you made to the firewall application.
- Click the Restart csf+isd button. It will restart the csf and isd and apply your firewall configurations.
- Click the Return button to go back.
Disable Testing
- Currently, your CSF application is running in the Test Mode. You have to deactivate the mode.
- Reaccess the csf – ConfigServer Firewall section and click the Firewall Configuration button.
- Locate the TESTING option in the Initial Settings section.
- Click on the Off switch.
- Again, you have to repeat the process to save the configurations. Click the Change button, and then the Restart csf+isd button.
- successfully installed and activated the CSF Firewall on your cPanel account.
Managing CSF in cPanel/WHM
To maintain a secure and well-functioning server environment, the effective management of your CSF firewall in cPanel/WHM is essential. Below is the guide with key steps to manage CSF using both the WHM interface and the command line.
- Begin managing CSF by navigating to ‘ConfigServer Security & Firewall’ from the WHM>Plugins section. This is where you can control various firewall settings and monitor activity.
- Regular monitoring of firewall activity is essential for identifying potential security threats. You can check the CSF logs using the following command. This log file provides valuable insights into firewall actions and helps you detect any unusual activities.
cat /var/log/lfd.log
- Manage IP whitelisting to ensure uninterrupted access for trusted users. There are two primary methods to manage your whitelist:
- Editing via Linux Shell:
You can directly edit the allow and ignore lists using the command line. For instance, to whitelist an IP, use:
nano -w /etc/csf/csf.allow
nano -w /etc/csf/csf.ignore
- Alternatively, for CentOS systems:
vi /etc/csf/csf.deny
Add the IPs you wish to whitelist, such as:
# Home office
192.168.1.1
# Remote developer
203.0.113.1
- It is easy to manage your IPs directly through the WHM interface. Go to ‘ConfigServer Security & Firewall’ from WHM>Plugins section. Under ‘Firewall Allow IPs’, you can specify as many IPs as necessary and ensure they are static IPs like those of your office or remote developers.
- Apply changes and verify connectivity. Restart CSF to ensure they are applied.
csf -r
To verify that your whitelisted IPs have access, check the logs:
tail -f /var/log/lfd.log
Consider advanced configurations for enhanced security, particularly against DDoS attacks. You can enable SYN flood protection with the following settings:
SYNFLOOD = “1”
SYNFLOOD_RATE = “60/s”
SYNFLOOD_BURST = “10”
PORTFLOOD = “80;tcp;80;5”
- CSF offers a range of command options to deeply manage and troubleshoot:
csf –status
csf –disable
csf –enable
csf –restart
These steps allow you to efficiently manage CSF in cPanel/WHM for robust protection for your server.
Conclusion:
With this guide on how to install CSF firewall for WHM/cPanel, you can ensure that your WHM/cPanel server is secure with the robust security provided by CSF installation, configuration, and management. The CSF firewall offers advanced protection and makes management super easy through the WHM interface.
As you continue to learn how to install CSF on WHM/cPanel and its other features, remember that staying proactive in managing your server’s security is key to protecting your digital assets. Contact us for more expert advice or to know more about our hosting solutions.