
- To configure SSH keys in cPanel, you can either generate a new key pair or import an existing key.
To generate a new SSH key for your account, follow the steps below:
- First, log in to your cPanel account.
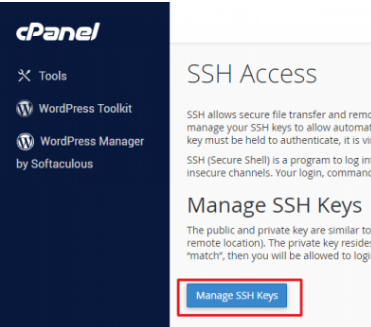
- Next, open the SSH Access tool.
- If you are currently using the Jupiter theme, navigate to the Tools page and click on “SSH Access” in the Security section.
- If you are using the Paper Lantern theme, go to the Tools page and click on “SSH Access” in the Security section.
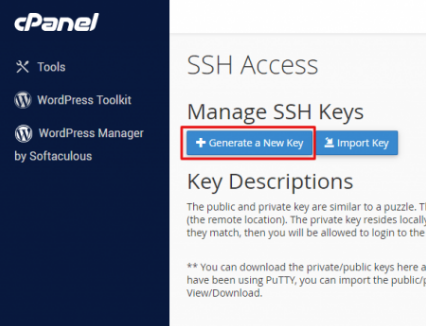
On the SSH Access page, click on Manage SSH Keys.
- click on the Generate New Key.
- Confirm that the key name is set to
id_rsa. - Enter the password for the key in the “Key Password” and “Reenter Password” boxes.
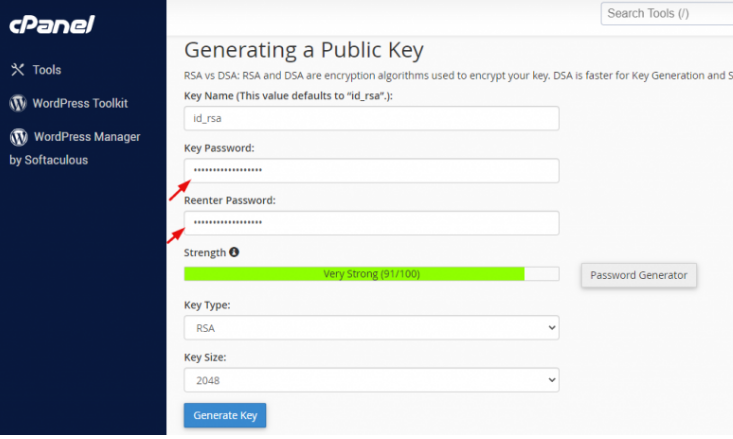
- After completing all the steps, click on Generate Key.
- Then, click on Go Back.
- Under the Public Keys section, locate the name of the key you have generated. Click on Actions > Manage. Then click on Authorize, followed by Go Back. Now, to connect your hosting account with the newly generated key.
Option 2: By Importing an Existing Key
- Login to cPanel.
- go to Security section > SSH Access
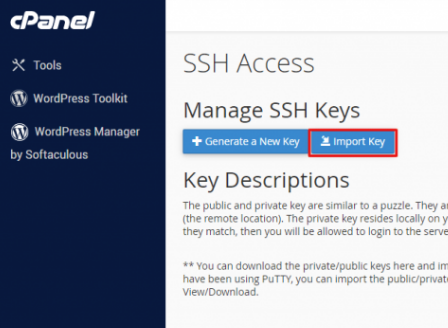
- the SSH Access page, under the Manage SSH Keys, click on Manage SSH Keys.
- Click on the Import Key.
- Now, in the “Choose a name for this key (defaults to id_dsa)” text box, enter the desired name for the key.
- Paste the text of the public key into the “Paste the public key in the text box” field.
- Finally, click on Import to have cPanel import the key.
- Click on “Back to Manage Keys.”
- Under the Public Keys section, locate the imported key name.
- In the Actions section, click on Manage.
- Click on Authorize, then click on Go Back.
How to Connect to Your Account Using SSH Keys
Windows OS
If your computer runs on Microsoft Windows, you can use the PuTTY program to connect your account with SSH keys. Alternatively, Windows 10 has a native SSH client that you can use without needing to install and configure an additional program.
To configure SSH using cPanel with PuTTY, follow these steps:
- Log in to your cPanel account.
- Under the security section, navigate to the SSH Access tool.
- On the SSH Access page, click on “Manage SSH keys” under Manage SSH keys.
- Find your private key under Private Keys and click on “View/Download.”
- Click “Convert” to convert the key to PPK format (id_rsa.ppk).
- Download the converted key and save it on your local computer.
To configure PuTTY to use your private key:
- Launch PuTTY.
- In the Category pane, expand “SSH” and click on “Auth.”
- Under Authentication Parameters, click “Browse” and select the id_rsa.ppk file.
- In the Category pane, click on “Session.”
- Enter your SSH username followed by the domain name (e.g., username@test.com) in the Host Name text box.
- Set the Port to 7822.
- Ensure the Connection type is set to SSH.
- Enter a name for your session in the Saved Sessions text box and click “Save.”
- To connect, double-click on the saved session name.
- This setup allows PuTTY to connect to your SSH account using the private key without requiring a password.